
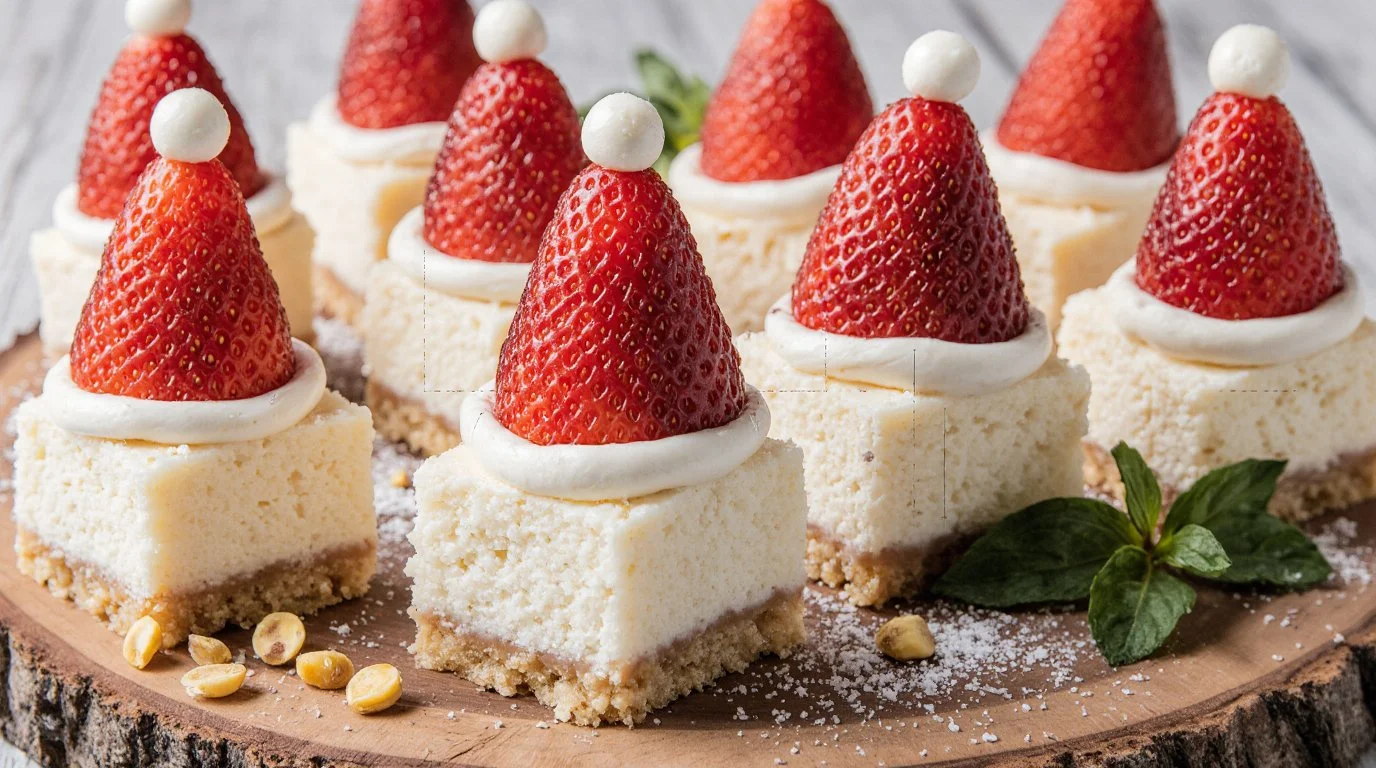
Looking for a festive dessert that’s as delightful to look at as it is to eat? Look no further than Santa Hat Crispy Cheesecake Squares! These heavenly squares combine a creamy cheesecake filling with a buttery graham cracker crust, all topped off with fresh strawberries that resemble Santa’s iconic hat. Perfect for holiday parties or a cozy evening at home, these squares are sure to impress your family and friends, while delighting your taste buds. Get ready to dive into this deliciously easy recipe and become the star of your holiday gatherings!
Why You’ll Love This Santa Hat Crispy Cheesecake Squares
These Santa Hat Crispy Cheesecake Squares are the ultimate treat for the holiday season. Here are a few reasons why you’ll absolutely love making (and eating) them:
- Quick and Easy: With minimal prep time and simple steps, these squares are perfect for bakers of any skill level.
- Perfect for Beginners: If you’re new to baking, this recipe is incredibly forgiving and easy to follow.
- Ideal for the Whole Family: Kids and adults alike will love these sweet, festive treats.
- Economical: Using standard pantry staples means you won’t break the bank making these delicious squares.
- Visually Stunning: The red and white presentation will make your dessert table pop and impress your guests.
The Necessary Ingredients
To create these delightful Santa Hat Crispy Cheesecake Squares, you’ll need a few key ingredients that come together in perfect harmony. Here’s what you’ll need:
- 8 oz cream cheese, softened
- 1/2 cup sugar
- 1/2 tsp vanilla extract
- 1 cup whipped topping
- 1 package of graham crackers
- 1/4 cup butter, melted
- 1 cup strawberries, halved
- 1/4 cup chocolate syrup (optional)
Notes and Substitutions on Ingredients:
- Cream Cheese: This forms the creamy base of your cheesecake. If you’re looking for a lower-fat option, light cream cheese can be used; however, keep in mind that it may slightly alter the texture.
- Whipped Topping: While store-bought whipped topping works best for this recipe, you can substitute it with freshly whipped cream for a more natural taste. Just whisk heavy cream until stiff peaks form for a delightful homemade touch.
- Graham Crackers: If you don’t have graham crackers, other crumbly cookies like digestive biscuits or vanilla wafers can serve as an alternative base for the crust.
How to Prepare the Santa Hat Crispy Cheesecake Squares Step by Step
Creating these festive cheesecake squares is a fun and easy process. Just follow these steps:
- Preheat the oven.
- Preheat your oven to 350°F (175°C). This ensures that your crust will bake evenly and become crispy.
- Pro Tip: Always preheat your oven for even cooking – it makes a significant difference in baking!
- Prepare the graham cracker crust.
- In a mixing bowl, crush the graham crackers into fine crumbs. Combine with melted butter until uniformly moist. Press the mixture firmly into the bottom of a baking dish to form the crust.
- Pro Tip: Using the bottom of a measuring cup can help you get an even layer when pressing the crumbs down.
- Make the cheesecake filling.
- In a medium bowl, beat the softened cream cheese, sugar, and vanilla extract together until the mixture is smooth and creamy.
- Pro Tip: Make sure the cream cheese is very soft for the smoothest consistency—leave it at room temperature for about 30 minutes before using.
- Add the whipped topping.
- Gently fold in the whipped topping into the cream cheese mixture until well blended. The whipped topping adds lightness to the filling.
- Pro Tip: Use a rubber spatula to fold rather than mix, preserving the airiness of the whipped cream.
- Spread the cheesecake filling.
- Carefully spread the cheesecake mixture over the graham cracker crust in your baking dish, smoothing it out evenly.
- Pro Tip: Shake the dish slightly to settle the filling evenly and minimize bubbles.
- Chill to set.
- Cover the baking dish with plastic wrap and chill in the refrigerator for at least 4 hours, or until set. This step is crucial for easy slicing.
- Pro Tip: For best results, let the squares chill overnight—this enhances the flavors and ensures a firm texture.
- Decorate with strawberries.
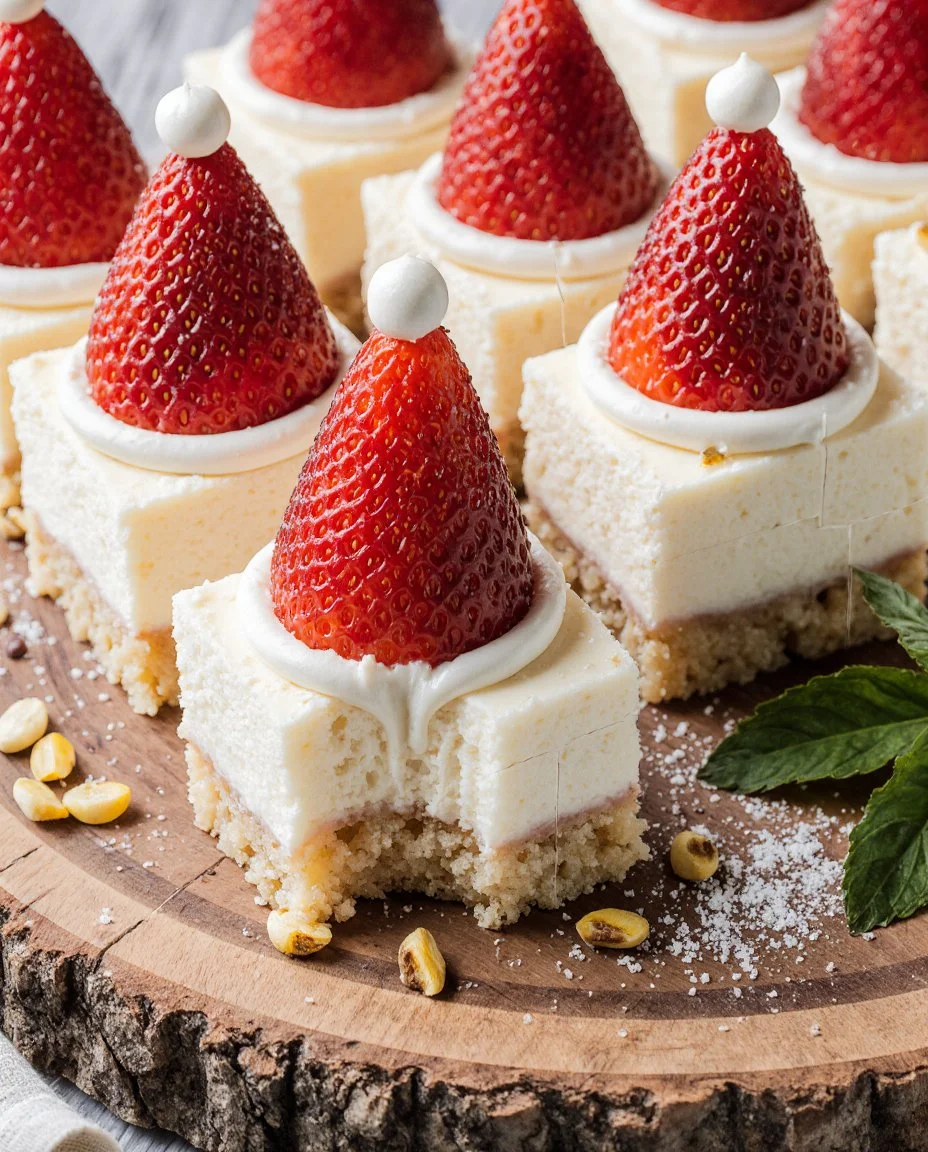
- Once set, arrange the halved strawberries on top of the cheesecake squares to resemble Santa hats.
- Pro Tip: Place the strawberries pointing upward for a more pronounced hat look!
- Serve with chocolate syrup.
- Drizzle with chocolate syrup if desired before serving for an extra touch of sweetness.
- Pro Tip: Serve the chocolate syrup on the side so guests can add as much (or as little) as they want.
Serving Suggestions
Make your Santa Hat Crispy Cheesecake Squares even more inviting with these serving suggestions:
Perfect Pairings:
- Drinks: Pair with a holiday spiced latte, hot chocolate, or even a sparkling cider for a festive touch.
- Side Dishes: Consider serving with peppermint bark or Christmas cookies for a dessert spread.
Occasions:
- Weeknight Dinner: Simple enough for a Wednesday night treat, yet festive enough for a holiday gathering.
- Special Occasion Meal: Impress guests at your holiday parties or family get-togethers with this festive dessert.
Serving Tips:
- Cut into squares for easy serving, and make sure to have plenty of napkins on hand!
- Top with extra strawberries right before serving to keep them fresh and vibrant.
Storage and Reheating Tips
To maintain the taste and texture of your Santa Hat Crispy Cheesecake Squares, follow these storage guidelines:
Refrigerated:
- Store leftovers in an airtight container in the refrigerator for up to 3 days.
- If you’re stacking the squares, place parchment paper between layers to prevent sticking.
Freezed:
- You can freeze these squares for up to 2 months. Cut them into squares, wrap each individually in plastic wrap, and then place them in a freezer-safe container.
Reheating:
- Since this is a chilled dessert, there’s no need to reheat—simply remove from the fridge about 10-15 minutes before serving to allow it to soften slightly for perfect slicing.
Guaranteed Success Tips
To help ensure your Santa Hat Crispy Cheesecake Squares turn out beautifully, keep these tips in mind:
- Don’t overmix the filling: Stir just until combined; overmixing can lead to a dense filling.
- Make sure cream cheese is softened: This ensures a smooth and creamy texture that is easy to work with.
- Allow adequate chill time: Be patient! Letting the cheesecake set in the fridge is key to achieving the perfect texture.
Recipe Variations
Feel free to get creative with these variations of the Santa Hat Crispy Cheesecake Squares:
- For a Chocolate Version: Incorporate a half-cup of melted chocolate into your cheesecake filling for a chocolatey twist.
- For a Nutty Crunch: Add crushed nuts, like pecans or walnuts, into the crust for added texture.
- For a Seasonal Flavor: Mix in pumpkin puree and a pinch of nutmeg for a festive fall-inspired cheesecake.
Frequently Asked Questions (FAQ)
Q: Can I use low-fat cream cheese for this recipe?
A: Yes, you can! However, the texture may be slightly different; low-fat cream cheese can be a bit softer than regular cream cheese.
Q: How do I know when the cheesecake is set?
A: The cheesecake should be firm to the touch but still slightly jiggly in the center, which will firm up as it chills fully.
Q: Can I use frozen strawberries?
A: Fresh strawberries are recommended for best presentation, but if using frozen, make sure to thaw and dry them well to avoid excess moisture.
Q: Can I leave out the chocolate syrup?
A: Absolutely! The strawberry topping alone is delicious, but the chocolate syrup adds a nice touch for those who are fans of chocolate.
Q: What if my crust crumbles when I cut it?
A: Make sure to press your crust firmly into the dish and let it cool completely before slicing; this helps it hold together better.
Q: How long will these cheesecake squares last?
A: They can last for up to 3 days stored in the refrigerator, but are best enjoyed fresh!
Q: Can I make these in advance?
A: Yes! These squares are great to make a day or two in advance. Just store them properly in the refrigerator.
Now that you have all the information you need, it’s time to get baking! These Santa Hat Crispy Cheesecake Squares will not only taste amazing but also bring a touch of cheer to your holiday celebrations. Happy baking!

Santa Hat Crispy Cheesecake Squares
Ingrédients
Method
- Preheat your oven to 350°F (175°C) to ensure even cooking.
- In a mixing bowl, crush the graham crackers into fine crumbs and combine with melted butter. Press firmly into the bottom of a baking dish to form the crust.
- In a medium bowl, beat the softened cream cheese, sugar, and vanilla extract together until smooth.
- Gently fold in the whipped topping until well blended.
- Spread the cheesecake mixture over the graham cracker crust evenly.
- Cover with plastic wrap and chill in the refrigerator for at least 4 hours, or until set.
- Once set, arrange the halved strawberries on top to resemble Santa hats.
- Drizzle with chocolate syrup before serving, if desired.