

Why go out for an expensive brunch when you can make these Red Velvet Pancakes at home?. They are fluffy, vibrant red, and topped with a tangy-sweet cream cheese glaze that tastes exactly like the frosting on a red velvet cake. It’s the ultimate romantic gesture for Valentine’s Day morning (or just because you deserve dessert for breakfast).
There is something magical about cutting into a stack of bright red pancakes. It feels celebratory. It feels special. And contrary to popular belief, they are incredibly easy to make from scratch—no box mix required.
The Science of Red Velvet
What actually is red velvet? It’s not just chocolate cake with red food coloring. True red velvet has a subtle cocoa flavor and a distinct « tang » from buttermilk and vinegar. This recipe nails that classic flavor profile while keeping the pancakes light as air.
The cocoa powder is minimal—just enough to give a hint of chocolate without turning them brown. The buttermilk is non-negotiable; its acidity reacts with the baking soda to create the bubbles that make these pancakes fluffy.
Why This Recipe is Perfect for Valentine’s Day
Pinterest trends for February are dominated by « Valentine’s Day breakfast » and « romantic brunch ideas ». These pancakes are the visual showstopper you need.
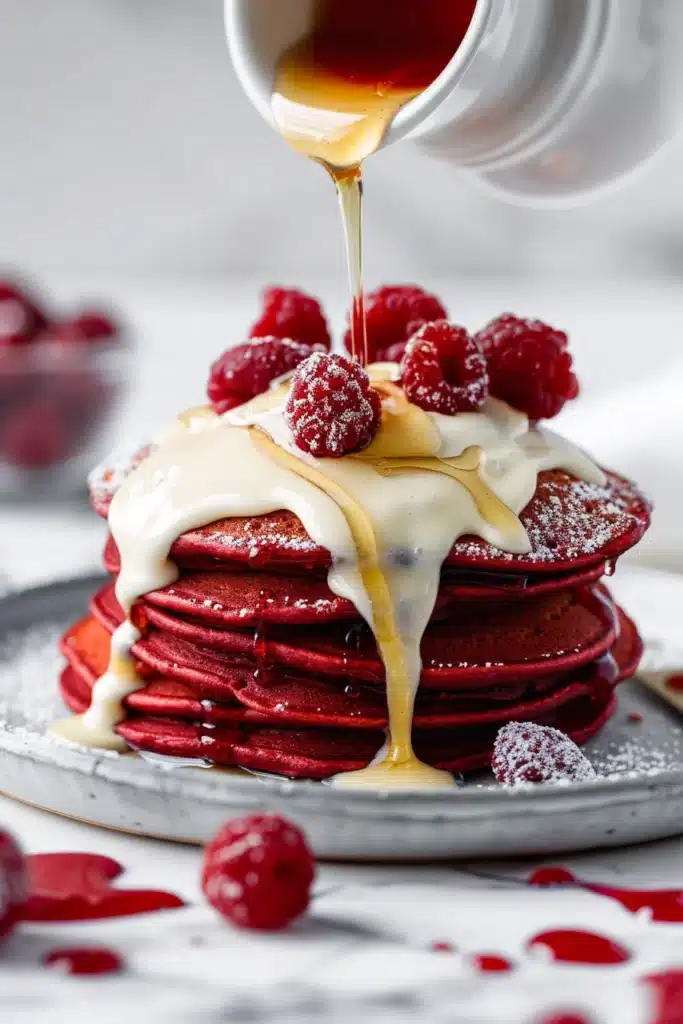
- The Look: The contrast between the deep red pancake and the white glaze is stunning.
- The Taste: Decadent but not overly heavy.
- The Effort: Looks impressive, takes 25 minutes total.
Ingredients You’ll Need
For the Pancakes:
- 1 ½ cups all-purpose flour
- 3 tablespoons sugar
- 2 tablespoons unsweetened cocoa powder (regular, not Dutch-process)
- 2 teaspoons baking powder
- 1/2 teaspoon baking soda
- 1/2 teaspoon salt
- 1 ¼ cups buttermilk (shaken well)
- 1 large egg
- 1 teaspoon vanilla extract
- 1 tablespoon red gel food coloring (see note below)
- 2 tablespoons melted butter (cooled slightly)
For the Cream Cheese Glaze:
- 4 oz cream cheese, softened to room temperature
- 1/4 cup powdered sugar (confectioners’ sugar)
- 3-4 tablespoons milk (adjust for consistency)
- 1/2 teaspoon vanilla extract
Optional Toppings:
- Fresh raspberries or strawberries
- Mini chocolate chips
- Whipped cream
Step-by-Step Instructions
Step 1: Mix the Dry Ingredients (5 Minutes)
In a large bowl, whisk together the flour, sugar, cocoa powder, baking powder, baking soda, and salt. Whisking breaks up any cocoa lumps, which is crucial because nobody wants a bitter lump of powder in their pancake.
Step 2: The Wet Ingredients & The Color
In a separate medium bowl, whisk the egg, buttermilk, vanilla, and melted butter. Now, add the food coloring.
Crucial Tip: Use Gel Food Coloring (like Wilton or Americolor) rather than the liquid drops. Gel is concentrated, so you get a vibrant red without adding too much extra liquid to your batter. If you only have liquid drops, you might need up to 2 tablespoons to get a good color.
Step 3: Combine & Rest
Pour the wet ingredients into the dry ingredients. Stir gently with a spatula just until combined. Do not overmix! Lumps are okay. Overmixing creates gluten, which makes rubbery pancakes.
Let the batter rest for 5-10 minutes. This allows the gluten to relax and the baking powder to activate, resulting in fluffier pancakes.
Step 4: Make the Glaze
While the batter rests, make the glaze. In a small bowl, whisk the softened cream cheese and powdered sugar until smooth. Gradually add the milk, one tablespoon at a time, until it reaches a pourable consistency. Stir in the vanilla. It should be thick enough to coat a spoon but thin enough to drizzle.
Step 5: Cook
Heat a griddle or non-stick skillet over medium-low heat. Grease lightly with butter or oil.
Pour about 1/4 cup of batter for each pancake. Cook for 2-3 minutes.
Watch closely: Because the batter is dark red, it’s harder to see if they are burning. Flip when bubbles form on the surface and pop. Cook the other side for 1-2 minutes.
Nutrition Information (Per Serving – 2 Pancakes)
- Calories: 420
- Protein: 9g
- Fat: 16g
- Carbs: 58g
- Sugar: 22g
- Sodium: 480mg
Secrets for Success
The Buttermilk Substitute:
No buttermilk? No problem. Measure 1 ¼ cups of regular milk and add 1 tablespoon of white vinegar or lemon juice. Let it sit for 5 minutes until it looks slightly curdled. It works perfectly.
Temperature Control:
Red velvet pancakes can brown quickly due to the sugar and cocoa. If your heat is too high, they will turn brown/black before they are cooked inside. Keep the heat lower than you would for regular pancakes and be patient.
Keep Them Warm:
Preheat your oven to 200°F (90°C). As you cook batches of pancakes, place the finished ones on a baking sheet in the oven. This keeps everyone’s breakfast warm until you’re ready to serve.
Variations
Chocolate Lovers: Fold 1/2 cup of mini chocolate chips into the batter for a « double chocolate » version.
Healthyish Twist: Use whole wheat pastry flour and substitute the sugar with maple syrup (reduce buttermilk slightly).
Pancake Shapes: Pour the batter into a squeeze bottle and draw heart shapes on the griddle for ultimate Valentine’s points!.
Common Questions
Q: Can I make the batter ahead of time?
It’s best to cook it right away because the baking soda starts reacting immediately. However, you can mix the dry ingredients the night before to save time.
Q: Can I freeze these?
Yes! Let them cool completely, then stack them with parchment paper in between. Freeze in a ziplock bag for up to 2 months. Reheat in the toaster for a quick weekday breakfast.
Q: Why are my pancakes flat?
Your baking powder might be expired, or you overmixed the batter. Remember: lumpy batter = fluffy pancakes.
Final Thoughts
These Red Velvet Pancakes are pure joy on a plate. They transform a regular morning into a celebration. The tangy cream cheese glaze cuts through the sweetness of the pancake perfectly, creating a balanced bite that keeps you coming back for more.
Whether you’re making these for your sweetheart, your kids, or just treating yourself (self-love is the best love!), this recipe is a guaranteed winner.